|
Welcome to The
Beater Site |
|
|
On hot sunny day this summer Cam (BlancoBronco), Emmet (ILVTNA, MudMad) and I went for a little 4x4 adventure but it was cut short when The Beater was charging up a hill and the radiator decided to blow chunks. It had overheated on 100 + degree days before but nothing like this. Parts
List: Total Spent $433 Minus bad alt, fuse and holder $ 399
I wanted to not only fix the problem but take it up a notch so this won't happen again. Emmet hooked me up with a heavy duty radiator. It's twice as thick as the stock one so it's a good start. I have seen a few write-ups from people that ditch the clutch fan and go totally electric. I like the idea but I want total cooling action.
I headed to the local Pick-a-Part and spent a few hours digging up a couple Ford Taurus 3.8 Liter radiator cooling fans. These draw a lot of power so I also grabbed a high output 130 amp 3G alternator from a 95 Mustang. My brother came by later to help me with this project.
I had to shorten the fan shrouds about 3/4" and carefully cut out areas for the hoses and transmission cooling lines. Each one has four nut and bolts holding it down firm. I also had to fabricate some custom brackets since the fan on the far side sticks out a little past the radiator.
Here is how the brackets look under the shrouds.
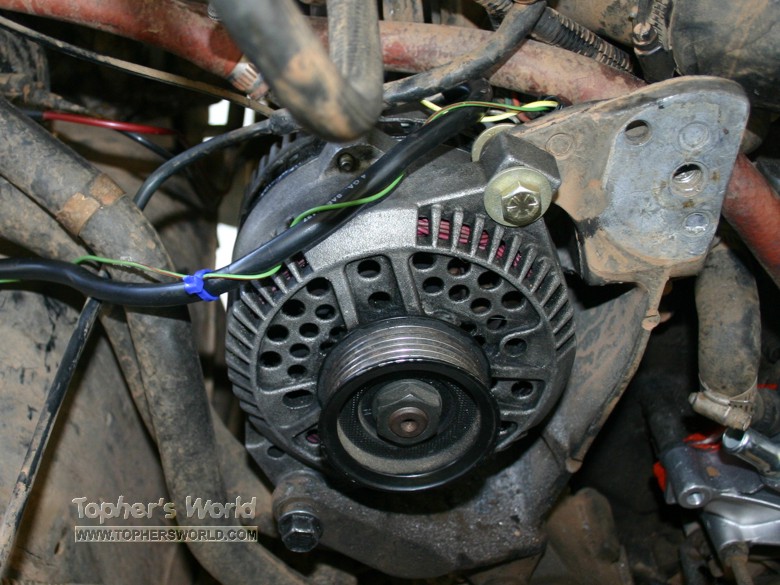
We then installed the first 3G alternator. I used 4 gauge switch to starter cables since this is a 130 amp alternator.
We placed a 175 Amp Mega Fuse with a bling bling fuse holder from the audio section since no-one had a normal one in stock.
I decided since I had everything out I would go ahead and replace the water pump. Bad Idea! I ended up braking off two of the bolts that go all the way through to the block. We spent the rest of the day trying everything easy outs to welding nuts onto the stubs to try and remove them with no success. We decided to try and use the 5 remaining bolts and a heavy amount of silicone to keep it from leaking. We got everything but the fans wired and started it up.
After installing the new water pump, it didn't leak there but did leak between the timing chain cover and the block. I also got nothing from the alternator so I took it to Pepboys where it failed all tests.
So we removed the radiator, all the pumps and hoses and spent hours trying to fineness the timing cover off with no luck. Those two snapped bolts were holding it tight. I finally decided to get tough and using a dremel with a cutoff wheel and a grinder with a cutoff wheel I cut out about half the bolt leaving enough of the housing to be able to eventually get a new nut on there to hold it tight.
Looking at what appears to be a core sample you can see why the cover didn't want to budge. 15 years of rust had welded the things in place. there isn't even threads there. Of course once we got the timing cover off what remained of the bolts unscrewed with ease.
With only 1 1/4" left we were able to pry the timing chain cover off. (#$@% Penzoil!) It looks like it's time to change the timing chain since I have it broken down this far. while relieved we finally got to a point where we can start putting it back together this is way further than I planned on taking it.
The next weekend I went back to Pick-a-part and got another 3G from a 1988 Taurus and a couple water pump bolts off an older 351. My brother came back for another weekend of torture and we started by placing the new timing chain set in. It's not only cleaner but the new chain made it a nice tight fit. We spent the next few hours muscling the timing cover back on. It was getting dark so we will continue putting the Beater back together in the morning.
Saturday late start but we got the water pump back on then all the pulleys, serpentine belt and hoses connected.
Before we put the radiator back in I decided it wasn't Beater enough. It needs a hole in the fender.
With the size of the new radiator and fans I couldn't replace the fresh air intake so I flipped the filter box and made a new one.
The hamsters in my head are spinning on ideas for a scoop or snorkel or some other way of pumping air into the box. Sometime I will get a K&N or similar filter.
By the time it got dark we had the radiator back in and all the hoses and stuff back in. Tomorrow we will fill the fluids, change the oil and oil filter then wire up the fans.
It was 100 degrees outside on Sunday so not a lot got done. We changed the oil and filter added water and started her up. It seems to be doing OK so far. The 3G from the Taurus works and there are no leaks. I have the fans wired to the relay. I will need a second one for high speed. I'll do that next week. Here's my solution for the cold air intake, for now anyway.
I got a second relay and made a bracket to hold them in place.
For now I wired the low speeds only. One is switched to the AC condenser. It will run with the AC on. The other is connected to the Fan controller from my old wimpy fan. It is set to 180 degrees. I also ran the high speed wires from the fans to the relays so I can easily switch it out if necessary.
I drove it about five miles and popped the Mega fuse. I will have to take a look and see what caused that to happen. It worked fine at idol (14.3 Volts) but when I gunned the motor it blew the Mega Fuse. I ordered a 200 Amp circuit breaker from a car audio place to replace it.
I installed the circuit breaker and managed to break it within a few minutes of installing it. The web page states that you push in the button to reset it. I did that since it was sticking out and went to move the arm where it says 200A. I broke a small piece of plastic on the inside. When I took it apart it could see that pushing it in actually breaks contact. I am waiting for the JB Weld to dry on the small broken piece.
This is the fan controller from the old aftermarket fan. The guy that installed it didn't have it wired properly. The yellow goes to positive, black to negative, orange to the fan and he had the green going to the AC condenser which does nothing. There is a small black that goes to a temp sensor in the radiator. I think if you insert a relay into the socket the other wires are for the high speed side but I have no idea where the red and blue go. (red to high speed power and blue to?) Well the fan
controller ended up being bad so I wired the second fan to a
switch on the dash. I started the Bronco and the serpentine
belt started screeching, then smoking so I shut it off.. The
alternator was burning hot so I thought it seized up. NO that
would be my second one. I pulled the belt off and the alt spun
free so that wasn’t the problem. I got a strait edge and
compared it to the other pulleys and it was about ¼” off. I
went to pull it and the sparks started flying. The 4 gauge
cable from the alt had melted the housing and was shorting
out. I pulled the battery cable then removed it. It's a few months later and one of the fans was making more and more bearing noise. It was the main one I was using so I decided to just go with one fan.
I got an adjustable fan controller (180 to 220 degrees) and wired it with two switches. One with auto off manual and the other with high low. it goes thru the first switch, auto for the controller or manual for a hot lead or off to override it when forging deep water. then it goes thru a high or low fan speed switch. from there it goes to the two relays one for each speed.
|
|